This year, Hanukkah falls on Christmas Day—marking just the fifth time since 1900 since both holidays have coincided on the calendar. With all eight nights taking place at the end of the year (and spilling over into 2025), you likely will have more time at home with your kids to celebrate. Make your holiday a bit brighter every night with our eight favorite Hanukkah crafts.
1. Watercolor Dreidels
You can make a version of this popular spinning top with ribbon, but this watercolor version is perfect for the fridge, or as part of a garland or mobile.
Materials:
- Bristol or chipboard with a matte finish (so watercolor can be absorbed)
- Watercolor paint
- Paint brushes
- Jar or plastic container to hold water
- Scissors
Directions:
1. Cut out dreidel shapes to give your kids a head start—or make one as a template, and teach older children how to trace it to produce multiple dreidel shapes.
2. Give your kids a paintbrush and have them paint each dreidel with a design of their choosing.
3. Let the dreidels dry and display them in your home.
(Source: CreativeJewishMom)
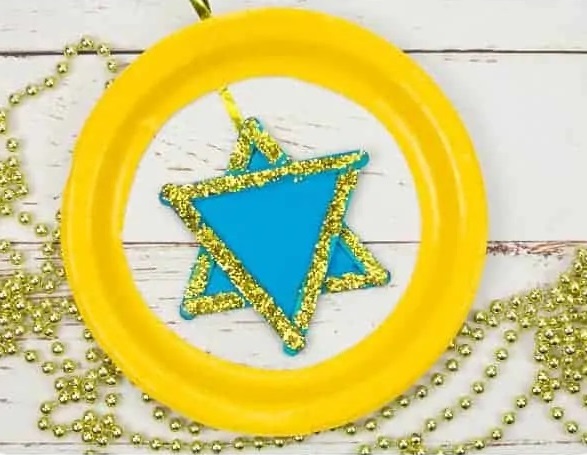
2. Star of David Suncatcher
A great craft for preschool kids, this glittery symbol of Judaism is an eye-catching way to celebrate the holiday.
Materials:
- Blue popsicle sticks
- Blue tissue paper
- Scissors
- Glue
- Gold glitter
- Double sided tape
- Gold ribbon
- Yellow paper plates
Directions:
1. Glue three blue popsicle sticks together to make an equilateral triangle. Repeat so you have two triangles.
2. Lay your popsicle stick triangles onto your blue tissue paper and draw around them.
3. Cut out your tissue paper triangles a fraction in from the edge.
4. Glue the tissue paper triangles across the popsicle stick triangles. Trim off any excess.
5. Glue the two triangles together to make a 6 pointed Star of David shape: One triangle should be upright, the other triangle will be inverted.
6. Add glue to the wooden popsicle sticks and cover in gold glitter.
7. Sticky tape a short piece of gold ribbon to the top of your popsicle stick star.
8. Cut the middle out of your yellow paper plate.
9. Sticky tape your popsicle stick Star Of David ribbon to the back of the paper plate frame.
10. Add another loop of ribbon at the top of your Hanukkah suncatcher and hang it up!
(Source: KidsCraftRoom)
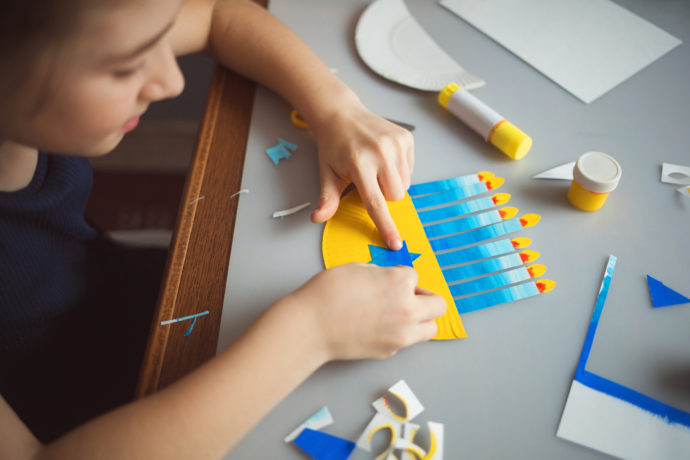
3. Menorah
From traditional and rustic to modern, there’s no shortage of menorahs to use to mark each day and night of Hanukkah. This decorative version is perfect to make with your kids.
Materials:
- Scissors
- Paint brush
- Colored construction paper
- Glitter glue
- Pencil
- Washable paint
- Glue
- Markers
- Paper plate
- Ribbon
Directions:
1. Cut the paper plate in half.
2. Cut a triangular slice from one half of the paper plate.
3. Cover plate pieces with paint. Dry 1-2 hours.
4. Glue paper plate slice to bottom of halved paper plate for menorah base.
5. Sketch and cut out 9 construction paper candles, making 1 candle slightly taller than the rest.
6. Sketch 9 candle flames on construction paper and add detail with markers. Cut out.
7. Glue candle flame to top of each candle.
8. Add sparkly details to candle flames with glitter glue.
9. Glue the tallest candle to the back of the plate to represent the shamash.
10. Working right to left, glue 4 candles to the right of the shamash and 4 candles to left of the shamash.
11. Add candlestick holders to the paper plate menorah base with glitter glue.
12. Attach ribbon to hang the DIY menorah. Let all the glue dry 3–4 hours.
(Source: Crayola)
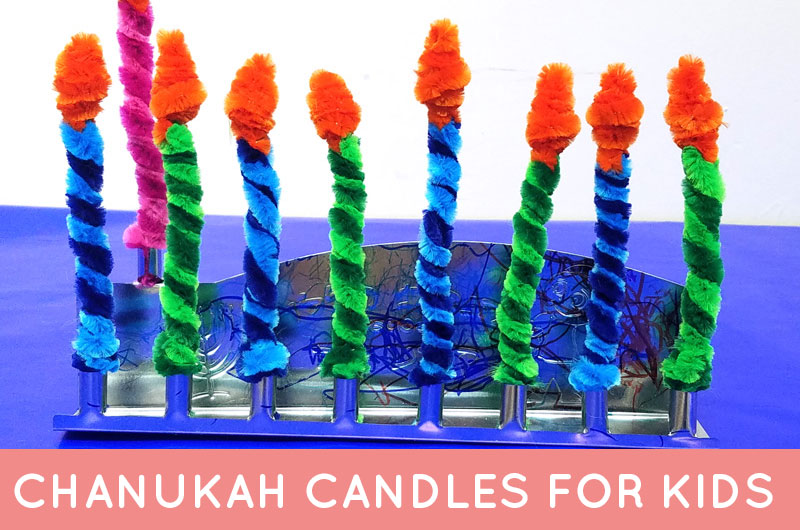
4. Hanukkah Candles
These pipe-cleaner candles are a flame-free way to show holiday cheer. Note: Because the pipe cleaners have sharp ends, adult supervision is required when making this craft.
Materials:
Directions:
1. Lay two pipe cleaners of the same color down on a flat surface. Place an orange pipe cleaner perpendicular on top of them.
2. Fold the orange pipe cleaner in half so that it’s centered over the candle colors.
3. Fold your candle colors in half.
4. Twist the two sides of the orange pipe cleaner together about 3/4 of an inch, or to your desired height.
5. Fold the two ends down. Start twisting one of them down again, making sure you DON’T twist it around the other half of the orange pie cleaner. Twist it till you reach the base; there should be a little left over.
6. Twist upward and secure, making sure the end is hidden.
7. Repeat steps 5-6 with the other half of your orange pipe cleaner. If you don’t get the exact process right, it’ll be fine – twisting it in this way gives you the shape of the flame. It will be great if it’s slightly off too!
8. Split your candle pipe cleaners into two, holding the two stems of each color together. Twist them together.
9. When you reach about 1 inch from the end, fold them up a little, and twist it around the candle, leaving enough space to tuck the candle into the candle holder. Tuck in the ends.
10. Make eight regular candles and a Shamash candle!
(Source: JewishMomsAndCrafters)
5. Dreidel Bookmark
This DIY bookmark is easy and cute. You can finally stop using scraps of paper or dog-earing pages!
Materials:
- Medium and dark blue origami paper
- Scrap paper in contrasting colors
Directions:
1. Grab a piece of origami paper in the desired color for your dreidel bookmark. You will also need some scrap pieces of paper in contrasting colors.
2. Make a square out of your paper by folding over one corner to make a triangle. Cut off the excess and rotate your triangle so the long edge is at the bottom and the right angle faces up. Make sure the top of the triangle is looking up and you have the long edge running perpendicular.
3. Fold the lower right corner up to meet the top right-angled corner. Repeat for the left side.
4. Fold the two papers back open.
5. Flip down ONE of the top sheets and crease.
6. Now fold the flaps you created back up, and tuck them into your bookmark.
7. Repeat for the other side.
(Source: RedTedArt)
6. Hanukkah Word Search
This downloadable word search is a hit for groups of kids and entertaining for the whole family.
Materials:
- Pen
- Paper
- Printer
Directions:
1. Download and print the Hanukkah Word search using the template. Make sure to print enough copies for all participants (or many rounds!)
2. Enjoy searching for Hanukkah words—or challenge each other as a family!
(Source: HappinessIsHomemade)
Paper Tops
Easily made with household materials, these paper tops are a traditional Jewish toy that is fun to spin and make.
Materials:
- Toothpicks
- Construction paper
- Scissors
- Glue
Directions:
1. Cut 1/4 inch wide strips of colorful construction paper.
2. Glue the edge of the paper to the toothpicks a little bit above the tapered edge and let dry.
3. Roll the paper tightly around the toothpick, and secure the end with glue.
4. Glue on another strip and continue rolling until your disc is about 1 inch thick.
5. Push the paper downwards, toward the toothpick point, with your thumb to create a bowl shape.
(Source: Parents)
Penny Spinners
These DIY spinners are easily made with cardboard and paper. Decorate with your favorite Hanukkah colors and art!
Materials:
- Cardboard (like from a cereal box)
- Printer paper (for decorating with Hanukkah symbols)
- Blue pens (for decorating)
- A penny/coin
- Scissors
- A glue stick
- Small plate and pencil for tracing
Directions:
1. Cut a circular shape from the piece of cardboard.
2. Decorate the cardboard with a Hanukkah theme.
3. Make a small cut in the middle of the cardboard and insert your penny.
4. Spin away!
(Source: RedTedArt)