As soon as the clock strikes midnight on Halloween, we look ahead to the holidays. But while the stores may be stocked with Christmas decorations in early November, this month is all about preparing for Thanksgiving!
Thanksgiving is the perfect time to get creative with your kids. Here are five fun Thanksgiving crafts ideas that will not only make your home feel more festive, but they can also help keep your kids busy and entertained during this hectic time of year.
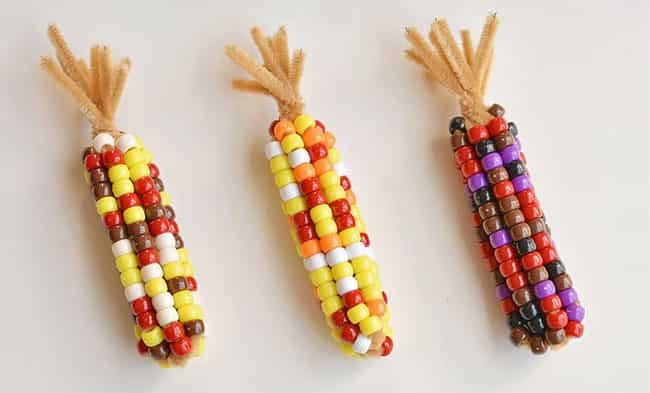
Beaded Pipe Cleaner Indian Corn
A low-mess craft made from only two materials, this adorable Indian “Calico” corn is a fall decor staple. Perfect for kids to make with minimal supervision on a chilly fall afternoon.
Materials
4 tan pipe cleaners (12 inches in length) for each ear of corn, assorted pony beads in various colors (we recommend yellow, black, orange, red, brown, purple, and white).
Directions

Line up the pipe cleaners so they are even on each end. Twist together in the middle. Then, evenly space out the pipe cleaners so it resembles a star shape, with equal amounts of space between each pipe cleaner. Thread various colored beads onto each pipe cleaner until each one is covered (you should end up with roughly 15 beads per row).
To shape each ear of corn, bend the pipe cleaners so they meet at the ends, taking care so the beads don’t fall off. Twist the tops of the pipe cleaners to form “husks,” leaving the ends free and bending them for shape and character.
(Source: OneLittleProject)
Apple Pie Play Dough
To keep hungry kids occupied until it’s time for the actual Thanksgiving feast, whip up a batch of this fragrant play dough, which smells like freshly baked apple pie.
Materials
2 cups baking soda, 1 cup corn starch, 1.5 cups water, 1 tablespoon vegetable oil, red food coloring, 1 tablespoon cinnamon, 1 tablespoon allspice, red food coloring (optional)
Directions
Add all ingredients to a pot except for the spices (which you’ll add during kneading!) If you would like to incorporate red food coloring, add a drop or two to the water before you put the pot on the stove. Stir well—the corn starch will initially be hard to mix, but will eventually turn into a runny liquid.
Put the pot on the stove, and cook until it resembles a thick mush that’s difficult to stir. It will be a bit stickier than what you’ll get when you’re done kneading. Turn off the heat and set the pot aside until the dough is cool enough to touch. To add the apple pie scent, sprinkle the spices into the dough and knead it until incorporated. Have fun making it into festive holiday shapes!
(Source: EmmaOwl)
Candy Filled Turkey Favors
An easy way to repurpose Halloween candy, these cute favors look like stuffed turkeys and make a great gift for dinner guests if you’re hosting dinner this year. Chocolates can also be used if you’ve eaten up your stash—or use stickers or other small toys if you want to save room for pie.
Materials
Halloween or chocolate candy with an autumn theme (and/or stickers or small toys); brown pipe cleaners and multicolored tissue paper, orange cardstock, scissors, googly eyes, glue.
Directions
Gather your selected candies (or small toys and stickers) for your turkey favors. To make the turkey’s body, cut a piece of brown tissue paper into a 12-inch square. To make its feathers, cut 6 strips of tissue paper in other colors so each measures 1 ½ x 18 inches. Fold each strip in half. To make the turkey’s beak, cut a piece of orange cardstock into a triangle.
To assemble, lay out your brown tissue paper and arrange the colorful tail strips on the center/top half of the square so they are hanging over the edge. Add your Thanksgiving treats to the middle of the brown square, partially covering the bottom of the tail strips. Gently lift the corners and edges of the paper and gather them around the pile of treats. Tuck the base of the tail feather strips inside the brown paper so the tops are sticking out. Twist a brown pipe cleaner around the pouch to hold it closed, trimming off excess paper if needed.
Finish each turkey by gluing on googly eyes and orange beaks.
(Source: KidsCraftRoom)
DIY Window Clings
When the pumpkins are over and it’s not yet time for Christmas decor, these homemade window clings are a great solution. With few materials and a little imagination, you can create autumn leaves, this is a great craft for younger kids.
Materials:
Puffy fabric paint, wax paper, printable leaf template, printer and printer paper, small paintbrushes (just in case)
Directions:
Copy and paste your selected leaf template into a Word or Google doc and print it out. Lay a piece of wax paper over the template. Using the puffy paint, trace the outline of the first leaf and fill it in with more paint, using the tip of the paint container to spread it around. If your kids are having trouble with this, it helps to have small paintbrushes on hand, too.
Let the shapes dry on the wax paper overnight. After the paint is dry, have an adult or older sibling peel the leaves off the paper, stretching them out if needed. The leaves can be stuck to the windows for some festive seasonal cheer.
(Source: TypicallySimple)
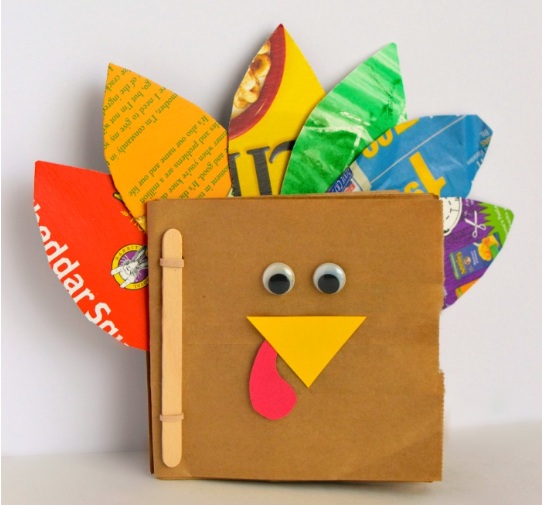
Thankful Turkey Book Craft
An easy way to teach your kids to practice gratitude year after year, a book of thankful thoughts can help kids verbalize and visualize what they are thankful for. Creating one with your children can become a way to spark meaningful conversation around your Thanksgiving table each year.
Materials
Brown paper lunch bags, single hole punch, rubber bands, craft sticks, red, orange and yellow construction paper, googly eyes, school glue, scissors, recycled cardstock (from cereal boxes), markers, stickers and family photos (optional).
Directions
Stack three brown paper lunch bags on top of each other. Fold the stack in half, and punch a hole on each end of the folded edge. Thread a rubber band through both holes, and thread a craft stick through both to “bind” the book.
To turn your book into a turkey, cut a beak shape out of orange or yellow construction paper, and a red wattle out of red construction paper. Use school glue to glue the beak, wiggly eyes, and wattle onto the front of the book. To add feathers to your turkey, cut oval feather shapes out of the cereal box cardboard. Glue the shapes to the back of the book so they are sticking up, and can be seen when the book is flipped over. Cut a piece of cardboard the size of your book, and glue it on the back, allowing the feathers to overlap for extra support.
When the glue is dry, you’re finished! Write “I am thankful for…” on the first page of the book with a marker, and gather your kids around the Thanksgiving (or kitchen) table. If you have photos of family members and festive stickers, offer them as inspiration for your kids to add to their thankful book. Otherwise, they can write or draw the things and people they are grateful for this holiday season…and you can add to the book year after year!
(Source: B Inspired Mama)