Weekend Craft Idea! If you’re like me, you have more pictures of your kid than frames, or wall space to hang them. And even though my son is only two, I already have sheets of unused wallet-sized school, holiday and family photos.
The back-to-school season is yet another opportunity to capture a special milestone. Here’s a cool photo frame you can make with your kids to commemorate the new school year (and finally use up those wallet-sized photos)!
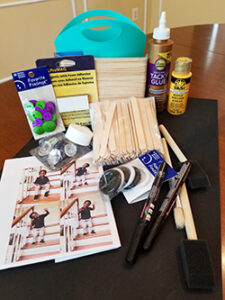 What You’ll Need

- 3 Jumbo craft sticks (5.75 inches)
- 5 Regular craft sticks (4.5 inches)
- Craft glue
- Yellow paint
- Paint brush or sponge
- Sheet of black foam
- Buttons and acrylic gems for wheels and bus lights
- Sharp scissors
- 2-inch round top to trace wheel shape
- Self-adhesive magnets
- Fine-point marker
Directions
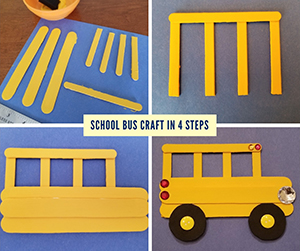 Take four of the small craft sticks and cut an inch off each of them. I used scissors. Then, paint all of sticks and let them dry (this usually takes about 20-30 min.).
- Arrange the four short sticks vertically with about one inch between each stick. You can use one of your wallet sized photos to make sure they are evenly spaced so your “bus windows” will look good. Glue the longer uncut skinny stick across the top of your four vertical sticks.
- Place the jumbo crafts sticks across the bottom. I recommend overlapping the middle jumbo stick with the top and bottom sticks because it will look better. Glue them in place.
- Cut two circles from the foam. If you want perfectish circles, you can trace the bottom of the round glue bottle or one of the tops from the dozen bubble containers you no doubt have in your house. Glue the buttons of your choice to the center of your foam circles and attach the “wheels” to the bottom of your school bus.
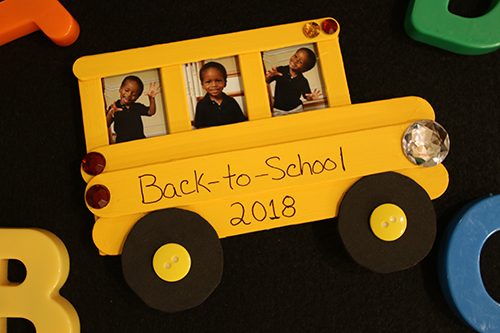
- Glue gems to the front and back of your bus to create bus lights. Let all the glue dry. Use the marker to write the year and the school name or, “Back to School” or “The Lester Kids.”
- Attach the pictures to the back of the frame with glue and let it dry. If you have more than one child, you can include individual and group photos.
- Add the magnets to the back so you can put it on your refrigerator or magnetic white board.
This is the perfect project for Friday Night Fun or a rainy day at home. Each child can make their own school bus and will love adding their personal touch.
Kisha DeSandies Lester is the senior editorial and digital manager at National PTA.