Mom, mother, mama, mommy…whatever we call our mothers, we can all agree that they are amazing. Every single day our mothers juggle the role of teacher, caregiver, supporter and friend. There are about 2 billion moms in the world, but only one like yours!
For someone who gives so much, it can be difficult to find the right way to say “thank you” or “I love you.” This Mother’s Day, help your kids create something that their mother will cherish forever. Try these three fun and easy crafts:
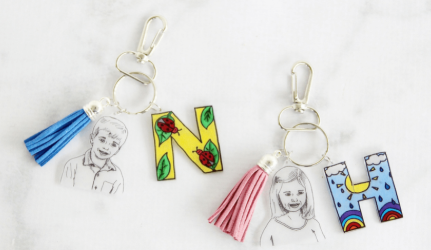
Shrink Film Keepsake Keychain
Materials:
- Shrink Film
- Keychain: Lobster Claw Hooks
- 10mm Open Jump Rings
- Hole Punch
- Scissors
- Sharpies, colored pencils or other permanent markers
- Optional: Leather tassels
Directions:
- Print out the initials you will be using. You can use Mom’s initials or personalize it with kids initials. On a word document, type your letters in the typeface “Franklin Gothic Heavy” at 400 size font, or get creative and choose your own!
- Once the letters are printed, place the shrink paper over top with the rough side facing up. Trace the outline of the letters on the shrink paper in black sharpie.
- Using colored pencils or semi-permanent markers, kids should create their own designs inside of the outline. Don’t worry about small mistakes, when you shrink the paper they will disappear!
- Once your letters are colored, use a hole punch to create a hole slightly above the top line of your letter.
- Cut around the edges, about a ¼” or so from the edge of the outline and around the hole. If you have letters with a middle section like “D” or “B” an adult should use a utility or X‐acto knife to cut out the center.
- Baking Time! Preheat your oven to 350 degrees and place your letters on a baking sheet lined with parchment or aluminum foil, a few inches apart.
- Turn on the oven light and watch as your creations shrink! (After about 1 minute in)
- At first your designs will appear shriveled, don’t worry! Wait until they flatten out and stop shrinking and then take them out of the oven.
- Once out of the oven, if you notice the designs aren’t completely flat, use a spatula to press down on them.
- Once cooled, pop on one of the jump rings, and attach to the key chain. A beautiful, thoughtful gift for mom!
Source: WhatMomsLove.com
Best Mom DIY Doormat

Materials:
- Stencil letters and shapes
- Plain doormat
- Outdoor acrylic paints (black shows best)
- 1 medium-large firm bristle brush
- 1 sponge brush
- Weatherproof sealing spray paint
- Paint tape
Directions:

- Lay your doormat flat on a covered table, or take outside and lay on flat surface. Outdoor paints are meant to last, so be sure anything of value is covered up.
- Lay out stencils on your doormat to write out out a message. If free-handing try to pick a simple message! Ex. “I Love Mom” or “Best Mom Lives Here”
- For stencils: once your message is laid out, tape down the edges of your stencils so they don’t shift around once you start painting.
- Time to paint! Use a firm bristle brush and push the paint into the bristles of the doormat, trying to get the color as deep as possible. (This is the first coat)
- Let the first coat dry for a few minutes, then go back in and touch up any unevenly coated letters and shapes.
- For the last coat use your sponge brush and go over the letters and designs once more. The sponge will help pack on the color on the very top of the doormat, so the more paint the better!
- Remove your stencils and let dry overnight. For Extra staying power, an adult can use a weatherproof clear sealant spray. (Recommended for uncovered porches)
- Wait until completely dry, and then gift to mom!
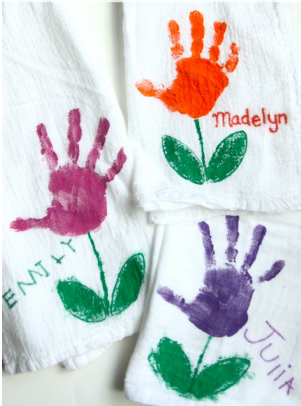
Handprint Tulip Towels
Materials:
- White Dish Towels
- Tape
- Cardboard
- Fabric Paint
- Foam Paint Brush
- Skinny Paint brush
- Toilet Paper Tubes
- Permanent Markers
- White paper
Directions:
- Lay towel(s) out flat and tape dish towel(s) down to cardboard surface (try using a cereal box)
- Have your child choose what color flower they want to make. Squirt the paint in their palm and use the foam brush to paint their palm. Try to keep the paint pretty thick and stamp it onto the towel 6 to 8 inches from the edge of the towel–leave enough room for the stem and leaves to be added.
- Flatten out a toilet paper tube, so it makes an oval with pointed ends (This is for your leaves). You could dip it in green fabric paint, or paint the edge of the roll with a brush.
- Using the toilet paper tube, stamp the leaves close together a few inches below the handprint.
- Have your child fill in the leaves with the paint brush.
- Lastly, have your child write their name( and any other message) in black marker on a blank piece of paper. Place the paper under the towel and trace the lettering in paint.
- Enjoy your practical and sentimental mother’s day creation!
Source: ICanTeachMyChild.com